
 Anti-detect Browser


-
25852Clasificación global
-
864Clasificación de país / región
-
1.76MSeguidores
-
931Videos
-
58.37MGustos
-
Nuevos vídeos11
-
Nuevos seguidores-2383
-
Nuevas vistas1.23M
-
Me gusta nuevos67.56K
-
Reseñas nuevas295
-
Compartir nuevo738

Florian Gadsby Tendencia de datos (30 dias)
Florian Gadsby Análisis estadístico (30 dias)

Florian Gadsby Videos calientes

Florian Gadsby


I know there’s other ways of glazing shapes like this, such as first coating the inside and then dunking the outside, or attempting to dip it all at once, but the reason I do it the other way around is as follows. The first thing to understand is that this specific glaze dries into an absurdly fragile layer. If I were to coat the interior first, let it dry, (which you must do in order for the walls to become desaturated with water—thus being able to absorb water again when the exterior is dipped), and then push it underneath the glaze like so, there’s a chance I’d chip or damage the interior surface as it’s plunged into the bucket of glaze. I personally feel as if I can handle the vessel more delicately if I do it the other way around, this way I’m pushing the jar into the glaze without worrying about harming the interior form. Yet, if you have a glaze that dries into a harder layer, then by all means do it the other way around, this is just what works for me. As for deciding to glaze these in two parts, I do this because by dipping the exterior like so and by slowly pulling it out of the glaze, I’m able to achieve a really flush, consistent layer on the outside. If I were to dip the entire vessel, pull it out of the glaze and then pour the contents back into the bucket, there’s a high chance that the glaze on the inside would spill over the exterior form. The large volume of glaze that flows out can be enough to manoeuvre the glazed that partly absorbed to the outside shape, creating an uneven layer. In this instance, unevenness is my enemy, which is precisely why I do it the slower, more careful way. #jar #pottery #ceramics #clay #glaze #oddlysatisfying #asmr
976K
 47.35K
 4.85%
4.85%
 45
45
 139
139
 535
535
Florian Gadsby

Fresh from the kiln, a wadded-up jar that still needs to be cracked apart and both parts ground together to be rid of nasty scratchiness that grogged clay bodies often take on after being fired. Despite being burnished smooth when leather hard to a glassy finish, as the stoneware fires the clay shrinks around the particles of grog, thus these become more noticeable again, causing the lid to grind as it spins in place, which isn’t ideal… To remedy this, I use Chemico valve lapping paste, this was what Lisa Hammond used on all her store jars and I must have spent dozens of hours repeating this process over the years when working there. Paste goes on, it’s ground in place, it’s wiped off, (you can actually save and reuse some of the paste to make it go further), then it’s all washed off with soapy water. Here’s some notes on that process as they always seem to come up, first of all, this paste is only ever used on BARE clay, never glaze, as it would scratch the glassy layer that coats pots severely. Secondly, yes, you could use the wheel to help this process, by securing the lid in place and pressing the body of it, the thing is, often the lid needs to be ground in more than just one orientation. If I were to just press the body against the lid as it spun on the wheel it would just create one prominent groove in the stoneware, which isn’t really what I want. So, by doing it by hand I have a bit more control. Thirdly, I know there are water soluble versions of this stuff, but what I like about this gel-based paste is that it clings in place, which means making grinding away a bit easier… unless of course you’ve got 30-40 pieces to get through, in which case even if it makes the grinding easier, the entire process itself is a loud, monotonous process. #qualitycontrol #asmr #satisfying #pottery #ceramics #handmade
157.17K
14.99K
9.54%
14
60
205
Florian Gadsby

I don’t always glaze the exterior first but I’ve gotten into the habit of doing so with this particular glaze as it’s so fragile once glazed. You’ll notice as I pull the form out of the glaze I have to grasp it by the rim, something that if I were to do when the interior was glazed, it could damage that section as it’s yanked out. Hence why I do the outside first, and then swirl it around the interiorly carefully, letting it pour out over the lip. In theory, I could wax the outside portion just beneath the rim, this way the glaze wouldn’t peel over quite so much, but in the past when I’ve waxed this particular glaze it ended up leaving traces of where it once was. Perhaps it was simply a fluke, a one-off, but it was enough to cause me to never attempt it again, plus, layering wax over such a powdery-fluffed up layer of glaze is difficult enough in itself. All of that leads to this rather convoluted process but it gets the job done and leaves me, hopefully, with a particularly uniform finish. #satisfying #asmr #pottery #ceramics #glaze #bowl #crafts
100.02K
4.03K
4.02%
3
16
29
Florian Gadsby

This weekend’s YouTube video is slightly different in that I’m taking a shape that brought into question on the pottery subreddit, yes, I occasionally lurk when I probably have better things to do. A user there was asking about this particular shape, how to make it and trim it, and thus, here’s my response, discussing not only how to make a wide shallow bowl like this, but there’s also some suggestions in how to alter the shape in order for it to, well, survive being fired to cone ten. A shape like this, if thrown to initial sketch, would definitely slump in my reduction firing, unless of course the overhang was thrown and left much thicker, which goes against some of my making principles. I enjoy the challenge, and hopefully the OP will find the video helpful, if they every stumble upon it. This could be an interesting new series, troubleshooting shapes and assessing them as I go, and no matter how many pots I’ve made, whenever you try something new you learn something in the making and trimming. Let me know what you think! #pottery #potterytutorial #bowl #handmade #craft #ceramics
71.4K
6.67K
9.34%
8
14
40
Florian Gadsby

If you’d like to watch both the throwing and the trimming of these trinket boxes or store jars, you can find a link to the fully narrated video via on YouTube via the Linktree in my profile’s biography. These are deceptive objects. Simple, yes, yet trimmed to an astonishing level, my fault really for accidentally throwing the lids far larger than need be… I’m sure I’m not the only person that’s measured the opening of their jars only to then knock it larger, or smaller, without realising. Thankfully, my general approach when making lidded ware is to throw the lids themselves thicker than need be, not the overhang itself, that was too much on these, but the vertical locating flange, for instance, is a segment of the pot I always throw more substantially, this way it can be trimmed back to fit the vessel underneath it no matter what. I’ll be trimming the underside of my lids regardless, so this fraction of additional material acts like a safety net of sorts. Yet, that’s no excuse for the portion of the lid that’s overhanging to this degree, the next time I make these I’ll spend a few extra moments measuring. These are useful pots though, the wider opening means I can easily reach inside to fish out salt or spices, or it can be used for trinkets, rings and the like, in fact, you can put anything inside, it’s not my job to tell you what to do with these. #pottery #satisfying #clay #stoneware #jar #ceramics #maker
63.96K
4.38K
6.85%
6
18
33
Florian Gadsby

These lined vases have been some of my favourite pots to emerge from the kiln lately, they’re fundamentally simple objects, which means getting the proportions right is paramount in their success, yet it’s the line that can really change them. The initial idea with these protrusions was for them to act like a continuation of the rim that travelled down the side of the pot, thus allowing the dramatic glaze breaking to not only encircle the sharp lip of the vase, but one face of it as well. It serves no purpose beyond giving the piece an obvious way to display it and they’re about the closest I get to hand-building. This process is slow and the coil must be allowed to dry in-between stages as it’s soft and tacky initially, which isn’t the best quality for the clay if you indent to create a flush, smooth mark. So, once joined roughly I let is sit for a while, (normally whilst I trim more vases and attach the coils), then I can go back and start work on the first, refining and sharpening the protrusion. It’s slow work that’s a nice counterpoint to the more rapid throwing my days and normally filled with. #vase #howto #craft #clay #ceramic #pottery #studiopottery
61.57K
4.02K
6.53%
10
20
39
Florian Gadsby

Before you ask why on earth I made these, considering my last tests with this black clay were so dreadful, well, these were thrown and trimmed long before I fired those initial tests. But I’ve got some ideas on how to get these through the kilns successfully. It seems that enclosed sections—whether it's the space within a lidded form (a body with a lid on top) or the cavity within a foot-ring cause the glaze to fire rough and scratchy, presumably because the gases can’t escape from the glaze and the manganese decomposing in the clay. So for these, they’ll be placed in the lowest-temperature spots in the kiln, and I’ll raise them up on props. I’m going to create a kind of channel in those props so the gas inside the foot can escape, or I’ll simply fire them on wadding, a clay-like mixture I make from 50% kaolin and 50% coarse alumina hydrate and stick, like tiny feet, into the foot, raising it up. Whilst I don’t think lidded forms will work with this particular black clay, I believe these should be fine, provided I don’t overfire them. #clay #stoneware #studiopottery #pottery #tableware #ceramics
59.42K
3.58K
6.02%
1
18
12
Florian Gadsby

After recently making a batch of low jars, I was tempted to create another that’s even lower and wider, and this is what I came up with. My main concern is the fine rim of the body section warping. I hope it’ll hold, and normally the wadded-up lid that’s placed in-situ as it fires is enough to keep it round, yet when scaling things up, or down in this case? There’s always the inevitability of things going wrong. All in all, it was easier to put together than I thought. The throwing of the two halves sort of felt like throwing two plates, so my second concern is the vessel warping or moving as it dries out to bone dry before the biscuit firing can be done. Thus, the box has been drying beneath plastic for a week or so, unwrapped daily and allowed to breathe before being smothered again. I’m not sure which colour to glaze this, white, black, pale-green, blue perhaps? With so many new buckets of glaze in the workshop I’m having a much harder time deciding how to coat the pots I make. #jar #pottery #tutorial #studiopottery #contemporaryceramics #box #craft
58.94K
3.41K
5.79%
5
18
41
Florian Gadsby

These pourers aren’t fun to trim, they topple to either side when upside-down and flattening and thinning the walls leads to creating ridges where the spout itself protrudes. I could not trim to the top but you know me, there are some things I have to do despite them being difficult. Thus, for these, I trim and create those marks and afterwards I spend some time carving them back, to create a flush surface again, which I then fettle over with a sponge-on-a-stick and then compress with my fingertips. The best part about all of this though, is being able to work the actual pouring edge back to being incredibly crisp, which means when used it should cut through the liquid wonderfully, resulting in a smooth, even pour. I even fractionally wipe the glaze back here so that the spout isn’t obliterated and smothered in glaze, (this can thicken the lip, rounding it and causing it to pour poorly). This extra work means they certainly take longer to create but it’s well worth it in the finished product, provided I don’t mess them up hereafter. #pottery #jug #qualitycontrol #carving #ceramics #studiopottery
53.28K
3.03K
5.68%
4
14
24
Florian Gadsby

The same few questions always come up when I show the handling process, the first asking whether I attach these blanks immediately, or whether they’ll allowed to stiffen up before being joined and pulled into their final shape. Waiting for them to dry does feel intuitive, yet in this instance it only makes the process more difficult, the blanks become harder to blend into the cup smoothly as the clay is simply more tenacious, you have to work harder to create a seamless blend between the two. Equally, when it comes to pulling the length into its final shape, if the stoneware is firm, you’ll find it’s more difficult to stretch out, yes, you may have to exert more control, as softer clay tends to collapse and tear more easily, but you’ll find it’s easier to make flowing, curved shapes when the clay is on the softer side. Thus, once the blanks have been pulled, they are immediately used, I want them soft, in fact, if I have many handles to pull or if it’s a particularly hot day, I’ll stack all the blanks up and will wrap them in plastic, as the wood tends to wick moisture out of them very quickly, drying out side of them and making them more difficult to pull. It’s a skill that’s initially a nightmare to learn, yet once the basics have engrained themselves in your muscle memory it becomes a joy, you’ve just got to persist through the pain. #handles #handlepulling #oddlysatisfying #clay #pottery #ceramics
46.16K
2.55K
5.51%
13
32
107
Florian Gadsby
Small stepped bowls, from start to finish, pots with absurdly tall feet, good for gripping onto as you eat from or drink from them. Thrown from approximately 450 grams of clay with a vast majority of that being left in the thick foot. I always prefer to throw them with too much clay in the base as compared to leaving a touch too little, this way I can always turn the pedestal-like base shorter, if necessary, but you can never easily add height back to pots like this, unless you do it when the pot is still on the softer side, which yes, is something I admittedly do from time to time. Bodging, as I’ve heard numerous potters call it, tacking on additions to provide more material to trim later or dropping in a ball of clay and smearing it on the bottom to further pad out the base—not everything has to be perfect at the thrown stage and changes can be made, you’ve just got to make sure your timing’s right. Get it wrong, try to add clay too late and that’s when things can go awry, cracks form around the knitted-on stoneware, leading to deep lines in the clay-work the glazes will pool into, this can seal them but they’ll still always remain present. Oh, and don’t you like the new callipers in the video? They’re nautical dividers that I’ve screwed to be incredibly tight, the best part though is their sharp tips, which score a beautiful fine line in the foot, with this set it ensures the diameters of all these feet are the same. #pottery #ceramics #satisfying #craft #maker #bowl #tableware
42.58K
3.02K
7.1%
7
15
47
Florian Gadsby

Proportion is EVERYTHING with these vases, with every type of pot honestly, but with these in-particular, there are some strict rules I follow to make sure they ‘feel’ right proportionally, not squat or heavy or unbalanced, and they’re as follows: First and foremost, the lower tapering part has to account for half or more of the overall height. If it’s shorter than the angular section on top, then it begins to feel clumsy and top-heavy, stumpy as compared to elegant. Secondly, the base, (and yes it can be trimmed narrower), has to be narrower than the pinched section towards the top, where the two walls meet. If the foot portion is wider or the same width, then again, the vessel loses its elegance. Third, the line around the waist, (where the lower half and the top half meet), has to always be the most outward point, other angles can be equal to it, but they can never splay out further, otherwise the form becomes top heavy and it throws off the proportionality. These might sound restrictive but sometimes it’s interesting to see how you can push the boundaries within a certain set of rules, moreover, these are just the rules I apply to myself when making these, by no means do you have to be a potter who creates according to order but it works for me, and I find I create the best vases when I follow these rules. #vase #wheelthrownpottery #maker #clay #satisfying #pottery
40.88K
3.34K
8.18%
15
19
46
Florian Gadsby

These are the earliest forms of these new black clay and glaze tests, wonky bowls unfortunately, due to being trimmed too finely and positioned right next to the burners in the kiln. It seems this blend of stoneware clays doesn’t hold up quite so well as compared to my usual mixture, which means from this point on, future pots will be potted more thickly and placed in more sheltered places inside the kiln. The very basic idea is my want for a simple black clay and glaze combination that end up feeling as if the vessels aren’t even glazed, yet I want just enough of a layer to cover once grog filled gaps and to smooth the forms a touch, (so I don’t need to be so fussy with the clay-work). Both bowls were reduction fired to cone ten, some 1290ºC, and along with the rims distorting a little bit, the bare clay bases also plucked away at the kiln shelf a touch, meaning they needed to be sanded a touch more than normal, (a task for which I use my @diamondcoretools diamond pads). With my typical stoneware, grinding back the clay too much reveals dull, grey stoneware underneath, but at least with this combination I can polish to my heart’s content without ruining any of the colour as well, all that’s revealed is even more black. Let me know what you think! #bowl #stoneware #experiment #satisfying #asmr #pottery
39.86K
3.75K
9.4%
6
40
38
Florian Gadsby

The only bad thing about glazing these pots in two goes, (first the outside and then the inside), is that there’s always a little bit of an overlap around the rim that needs a bit of work. It’s easily corrected, provided you take it slowly and try not to carve it back all in one go, there’s nothing more annoying than a whole segment of glaze chipping off at this stage, which then needs to be filled, dried and fettled back flush. When this happens, I sometimes even tempted to simply wash all the glaze off and start again. The only GOOD thing about glazing these vases in two goes is that there’s ample glaze around the rim, which means it can be carved back almost like clay, to a defined edge to mirror that of the clay-work underneath it. I say this, as if a rim is left too smothered in glaze, when fired it can completely change the nature of the vessel, making it feel thick and heavy, as compared to light and delicate, like I’m after. Yet, it’s worth being aware that not all glazes are the same, and what’s shown in this video may not be applicable to the sorts you use. #asmr #pottery #satisfying #ceramics #glaze #vase
34.33K
2.56K
7.47%
4
14
16
Florian Gadsby

When a pot has a particularly thin or delicate rim and it’s on the drier side, it’s more likely to crack if secured to the wheel with three lugs of clay or mechanical arms like found on a Giffin grip, equally, if the rim is finely trimmed and the clay is still relatively wet, it’s also likely to be deformed by the above. In these cases, as I’d be lying if I said I’m always trimming my work when it’s the perfect consistency, I often use a sticky pad like this—a round of chamois leather works too, as does a thin pad of foam. It works nicely provided you press down firmly enough from above, (using a spinner in this case), yet I’d say it does lend itself to be slightly more technical trimming and it’s remarkably easy for everything to abruptly go terribly wrong, or rather, the pot flinging off centre and destroying itself. Hence why this isn’t a technique I’d recommend to somebody that’s new to trimming, in that instance pinning the bowl to the wheel with clay stuffed around the rim is a much safer method. Thanks @DiamondCore Tools for the sticky pad and Kevin Scott for the super spinner. #pottery #trimming #handmade #satisfying #tools #ceramics
31.64K
2.28K
7.19%
4
12
30
Florian Gadsby

During my college years, I threw many batches of bud vases with curved, bellied forms and narrow necks, they felt like the quintessential bud vase form, whatever that meant, they were rounded, soft shapes, akin to the vessels I threw many thousands of during my years as an apprentice. Then, as my style gradually developed and became more angular and sharper too, these bud vases started to feel very out of place, almost as if they were made by another potter, so I started to create simple cylinders at first, straight up with a crisp lip, but the flowers and stems placed inside would often tilt over too much. What they needed, to stay upright, was a narrower opening, hence how this specific shape developed, a form that’s quite tricky to make and one that requires careful clay allocation to certain parts in the initial cylinder. These feel far more welcome within my range, part of the family, as compared to a distant cousin. It’s an unusual quality to notice, but sometimes a pot you make simply won’t feel right, it’s not yours, it’s another style and one you feel very disconnected to. #vase #budvase #pottery #ceramics #satisfying #howto #craft
29.55K
3.07K
10.38%
3
16
30
Florian Gadsby

These types of plates top the chart for most satisfying object to create, they’re straightforward to throw provided you have big enough bats and I’d say by far the single worst moment is wiring a vessel like this, off of the bat itself, the sheer potential for things to wrong is so astronomically high. Once thrown and safely separated from the bat though, they’re a breeze, as long as they’re trimmed and dried evenly so they stay flat throughout the process, in fact that’s likely the second trickiest part of the making these, finishing them so they don’t warp, also a nightmare. It’s for this reason that whilst leather hard a pot like this is only ever flipped around between two bats as it’s so easy to accidentally bend the plate, warping it, which could eventually lead to cracks forming. Once bisque fired, I lay these pieces on a flat surface to see if they teeter or spin. If they do it’s at this stage that I grind back the offending clay until it sits flat. If you catch it here it normally doesn’t come back to haunt you once reduction fired. Glazing is simple, again provided you have a wide enough bucket, in and out, that’s it. I used to be wary about placing the pots on foam like I do, my fear was it would grind away the dry powdery glaze itself, and it can if you rub it around on that surface, but the heavier objects tend to hold themselves down firmly enough so this doesn’t occur. Then it’s fired again, this is the final test and there’s still plenty that can go wrong, but it worked a treat this time. Thanks for watching! #plate #tableware #pottery #ceramics #maker #craft #satisfying
27.78K
2.45K
8.81%
4
9
32
Florian Gadsby

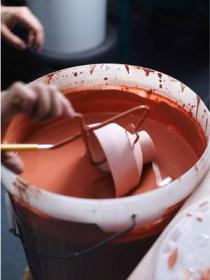
It’s been a week of making glazes in preparation for some up-and-coming reduction firings. This blue is one a number I’m mixing up in larger quantities, 8 kg to be exact, with more or less the same amount of water. As they’re new glazes I haven’t tested properly, as in I haven’t dipped pots into them before, only tiles, I tend to mix them thick and then add water, (that’s also measured—I’m going to be more diligent with this, thanks Matt, @ceramicmaterialsworkshop), until the mixture feels like it’s the right consistency. This will make mixing the glaze in the future easier as I start with the perfect amount of water in the bucket prior to dumping in all the raw materials, then I can just check it as I go using a hydrometer. I know this is glazing 101 but with the feldspathic crackle glazes I’ve been using for so long, I can easily judge the correct thickness via the archaic, ‘how it coats a finger’ test, but with these new glazes and for continuing into the future, I need to be more measured and careful. Results sometime next week, if everything goes according to plan. #glaze #reductionfired #pottery #ceramics #asmr #howto #oddlysatisfying
26.65K
2.24K
8.42%
2
12
22
Florian Gadsby

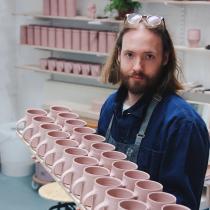
This is just a brief preview of this weekend’s YouTube video. If you’re curious to learn more about the process of throwing, trimming, and managing the production of 200 mugs, I recommend watching the fully narrated film, available via the Linktree in my profile’s biography. The main focus is on handle pulling, which presents one of the greatest challenges, managing the moisture level of the pots. After trimming, the mugs must dry just enough to support a handle, but not so much that the clay becomes brittle and prone to cracking around the newly attached appendage. With only a few mugs, this is easily manageable but scale that up to 200, and drying becomes a process in itself, requiring as much attention as say, throwing or trimming. These particular mugs are a bit of a tease, as I can’t yet show the stamped bases or the glazes they'll eventually wear. Hopefully, I’ll be able to share more on that soon. In the meantime, if you're interested in a deeper dive into repetition making and my enduring love for hand-pulled handles, I’d love for you to check out the full video. Thanks so much! #maker #wheelthrownpottery #craft #satisfying #pottery #ceramics #clay
20.81K
1.67K
8.01%
1
7
15
Florian Gadsby

My YouTube video this weekend is one for the nerdy, tool-obsessed trimmers out there. It’s all about the spinners I use on top of my pots as I trim them, from what their function is, to why I think they’re useful and are perhaps better than simply using your fingertips, together with discussing my own personal preferences as to what I think makes a good one. If you’d like to indulge in 15-minutes of spinner chat, you can find a link to the fully narrated video in my profile’s biography. (Tap the Linktree and click on the very top link) When putting this video together and properly thinking about spinners, how I use them and why I use them, I did some to a sort of revelation, they were a step, so-to-speak, in my journey as a potter, as whilst they’re so incredibly simple, the difference they make is rather staggering. For instance, when filming this week’s film and returning to some of the older spinners I have, (those without a ball-bearing inside), the difference in concentration and pressure needed to pin the pot down is remarkable. When using a spinner with a ball-bearing and a comfortable handle, I can trim with more attention on my hand that’s holding the turning tool and therefore the shape of the pot itself, without a spinner, or using one that is just a simple flat surface, part of that attention is put back on my left hand, the one that supports the spinner, keeping it place, as you constantly have to readjust the fingers on it and the spinning motion of the spinner itself influences the movement of your fingers. I’m probably massively overthinking it but I’d wager I’m one of the potter’s that’s used a spinner like this the most so there’s no wonder why they’ve been in my thoughts so much. The truth is, there’s an awful lot of spinners online and some are far better than others in my opinion, so in this video I also breakdown what I think you should be looking for. Thanks for watching! #pottery #tools #toolsofthetrade #satisfying #asmr #crafting
20.29K
1.08K
5.3%
0
5
9
Únase a nuestro grupo de Facebook TikTok Inspiration
¡Compartiremos los últimos videos creativos y podrá discutir cualquier pregunta que tenga con todos!

TiktokSpy from IXSPY
Herramientas digitales para influencers, agencias, anunciantes y marcas.
Compañía de terceros independiente, no el sitio web oficial de TikTok.
Copyright@2021 ixspy.com. All Rights Reserved


